

This is an old revision of the document!
Setting Up Grain Trader For Import

Data Matching
Before you can import loads from either a Bulk Handler or Grain Trader Transport defined format file you need to prepare your Grain Trader database so that the data for each load can be correctly matched to its Grain Trader equivalent. This data matching occurs in four areas:
Matching Suppliers or Buyer
Suppliers
If you will be importing load data from Bulk Handler defined format files you need to ensure that the growers as identified in the Bulk Handler file can be matched to those in your Grain Trader database using either their NGR Number, or another number that is unique to each supplier that suits your purposes (eg a Bulk Handler-specific supplier number). These are entered on the Supplier window, Other tab, as shown below:

Buyer
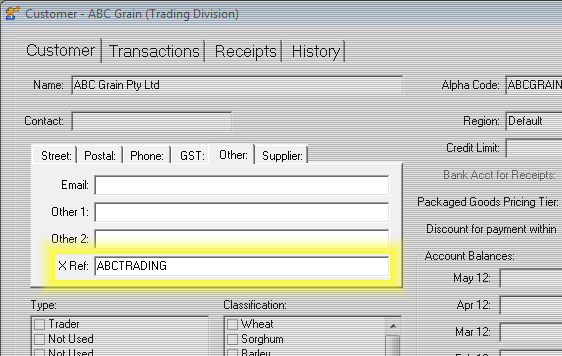
If you will be importing load transport data exported from a Grain Trader trader entity database into a Grain Trader transport entity database you need to create a Buyer in the Grain Trader Transport database that is the Trading entity. In this way when the Trading entity uses the Transport entity as the carrier for a load, the details will be exported from the Trading database and when imported into the Transport entity database, a load will be created that charges the Trading entity for the freight cost.
In the Transport (importing) database just create a Buyer in the normal way, recording the Alpha code used for the next step: Setting Up Grain Trader For Transport Export
Matching Commodities
Commodities are matched using the Cross Ref code entered on the Commodity window:

It is assumed that all bulk handlers use the same code to identify the same commodity and grade eg APW for APW Wheat.
Matching Storages
Each Bulk Handler will have their own codes for the storage sites used. Our recommendation is that you create a storage for each Commodity and Bulk Handler you use; this will make it easier for you to keep track of who owns what and where over time. If later you no longer wish to use a combination you can just make that storage Inactive and it won't be available for selection from drop-down lists etc.
You need to obtain the Storage cross-reference codes used by the Bulk Handler you are dealing with from them, and enter them in the XRef column of the grid on the Storages tab of the Commodity window, as shown below:

Matching Metrics
Metrics are the measurements of the various parameters of the grain that can be used to determine its grade and/or quality and/or price - for example, Protein, Moisture, Oil Content etc. You might not be using them for purposes such as these, and depending on the grain, the Bulk Handler and other factors they may or may not be present in the import file you obtain from the Bulk Handler.
Even if you're not using metrics to classify the grade or make bonuses or deductions based on their values, you may wish to record them for potential use in the future. Grain Trader recalculates a weighted average of up to the first five metrics for the commodity in each storage on every incoming load, so you can tell at a glance the overall storage averages.
If you do not wish to record values for any individual or all metrics (and they are included in the Bulk Handler's import file), you need not configure the Commodity for those metrics (as described in the section Defining the XRef Term For a Commodity and Handler below). However any metrics found in the import file which are not cross-referenced in the Grain Trader commodity will generate an entry in the import error log unless you choose to ignore them - see the section Importing the Loads below for more detail.
Configuring the Bulk Handler Schedule
Because there are different import file types available from some Bulk Handlers (notably GrainCorp), but all the formats from one handler can use the same cross-reference terms, Grain Trader allows you to define the terms only once for each Bulk Handler and Commodity (however the system is flexible enough to allow for a different list of terms should this be needed in the future). To configure these you first need to give each Bulk Handler schedule of terms a name of your own choosing, then allocate the file format(s) they provide to their schedule. Select the Utility | Import | Manage Load Import Formats menu to display the Manage Load Import Formats window:
 The names you give to Schedules are used as the column headings on the Bonuses & Deductions grid on the Commodity window. The order of the Schedule names on the Manage Load Import Formats window top-to-bottom corresponds to the order left-to-right on the Commodity window.
To add a new Schedule, click New and enter the name you want to use in the grid, then click Apply.
 You can also delete a Schedule if it is no longer required. Deleting a Schedule removes the column with that heading from all Commodity windows, and all its XRef values from the database. Existing loads are not affected in any way, but you will not be able to import additional loads using that Bulk Handler Schedule.
You then need to associate the import File Format(s) to its Schedule as appropriate. CDA Software provides a file for each type of Bulk Handler import file, whose contents define how Grain Trader is to interpret the import file. These definition files have an extension of .idf and reside in the same folder as your Grain Trader program, usually
C:\Program Files\CDA Software\CDA Grain Trader
on 32-bit systems or
C:\Program Files (x86)\CDA Software\CDA Grain Trader
on 64-bit systems. Grain Trader automatically finds these files if they exist on your computer (or terminal server) and stores information about them in your database. If the file is later deleted from disk, the stored data is not automatically removed, but the checkbox in the Found column of the Formats grid will be unticked, and you will not be able to import files of this type from the workstation you are using. Definition files for all currently-supported formats are installed when you install Grain Trader or a patch upgrade. You can download additional or missing formats from the CDA Software website if needed.
Contact CDA Support if you need to be able to import files of a format that is not currently supported. You will need to send us a copy of your Grain Trader database, sample import file(s) and a definition of the import file contents (usually obtained by the Bulk Handler). (We may charge you for this work but if so will discuss this with you prior to any work being carried out.)
To associate an import File Format with a Bulk Handler Schedule, click in the Metrics XRef Schedule column cell of the Formats grid for the Format you want to associate and select the Schedule from the drop-down list, then click Apply.
 You can also delete a format definition (.idf) file from your disk, and all its associated data from your database, by clicking Delete. Existing loads are not affected in any way, but you will not be able to import additional loads using that file format. Note however that if the format is still supported by Grain Trader, the next time you install a patch update the format definition file will be re-installed, automatically found and added again.
Defining the XRef Term For a Commodity and Handler
When you have finished configuring the Bulk Handler import formats you can enter the Bulk Handler's cross-reference codes for each metric on the Commodity window. Scroll the Bonuses & Deductions grid across to the right to see the column(s) for each Schedule you have defined, and enter the values in the cells for each Bulk Handler and Metric as required.

If you do not enter a cross-reference code for a metric and later import a Bulk Handler file that contains this metric it will not be imported and this fact may be recorded in the import error log, depending on your other import settings. See Importing the Loads below for more details.